
Download Australian Postcode Data

Buy Now $30.00
Postcodes 2,952
Suburbs 14,665
States
New South WalesSouth Australia
Western Australia
Queensland
Tasmania
Victoria
Self-governing territories
Australian Capital TerritoryNorthern Territory
Sample Data set
| ID | Suburb | Postcode | state_shortname | state_longname | lat | lng |
| 15603 | Waterloo | 7109 | TAS | Tasmania | -43.204994 | 146.968018 |
| 12267 | Waterloo corner | 5110 | SA | South Australia | -34.732128 | 138.583435 |
| 13713 | Watermans bay | 6020 | WA | Western Australia | -31.850863 | 115.754890 |
| 15603 | Waterloo | 7109 | TAS | Tasmania | -43.204994 | 146.968018 |
| 3340 | Watersleigh | 2540 | NSW | New South Wales | -34.855186 | 150.520370 |
Features
- Available in multiple formats - .csv .sql .doc .json .xml .yml .ods .odt .pdf
- Easy integration for existing or new web sites, mobiles apps...etc.
- Well-ordered, clean data set
- GIS related PHP scripts and functions free for developers
- Satisfaction
Contact us for any queries.
* Please note that there may be slight accuracy related problems in the data set as Australian postcodes are changing constantly.
Firefox Geolocation Spoofing

Firefox Geolocater is a great for playing with fake geolocations. You can add geolocations as you wish and check how your Firefox browser take each of those locations as your current location. The plugin is very useful for developers who are building GIS web applications. You can download it here.
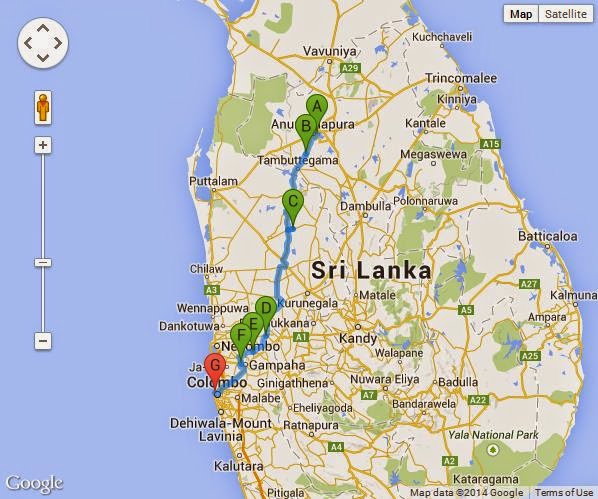
Google Map Multiple WayPoints
 |
| Google Map Multiple WayPoints |
<!doctype html>
<html>
<head>
    <meta charset="utf-8">
    <title></title>
    <script type="text/javascript" src="http://maps.google.com/maps/api/js?sensor=false"></script>
    <script type="text/javascript" src="http://ajax.googleapis.com/ajax/libs/jquery/1.5.1/jquery.min.js"></script>
    <script type="text/javascript">

        var myRouter = {
            map_: null,
            directionsHelper_: null,

            stores: [
                    {name: "Thalawa Station", location: new google.maps.LatLng(8.231796, 80.348333)},
                    {name: "Maho Station", location: new google.maps.LatLng(7.8228, 80.2778)},
                    {name: "Mirigama Station", location: new google.maps.LatLng(7.242555, 80.126472)},
                    {name: "Veyangoda Station", location: new google.maps.LatLng(7.153015, 80.058488)},
                    {name: "Gampaha Station", location: new google.maps.LatLng(7.093543, 79.993703)}
                ],

            calcRoute: function() {

                var waypts = [];

                for (var i in this.stores) {
                    waypts.push({
                        location: this.stores[i].location,
                        stopover:true
                    });
                }
                var request = {
                    //origin: new google.maps.LatLng(8.344216, 80.410917),
					origin: "Anuradhapura Railway Station",
                    destination: "Colombo Fort Railway Station",
                    waypoints: waypts,
                    optimizeWaypoints: true,
                    travelMode: google.maps.DirectionsTravelMode.DRIVING
                };

                var _SELF = this;
                this.directionsHelper_.route(request, function(response, status) {
                    if (status == google.maps.DirectionsStatus.OK) {
                        _SELF.directionsDisplay_.setDirections(response);
                        return;
                    }
                    console.log('Directions Status: ' + status);
                });
            },

            init: function(mapid) {

                this.directionsHelper_ = new google.maps.DirectionsService();
                this.directionsDisplay_ = new google.maps.DirectionsRenderer();

                var center = new google.maps.LatLng(8.344216, 80.410917);
                var myOptions = {
                    zoom:7,
                    mapTypeId: google.maps.MapTypeId.ROADMAP,
                    center: center
                }
                this.map_ = new google.maps.Map(document.getElementById(mapid), myOptions);
                this.directionsDisplay_.setMap(this.map_);

                this.calcRoute();
            }
        };

        $(document).ready(function() {
            myRouter.init('map');
        });

    </script>
    <style type="text/css">
        #map {
            height: 500px;
            width: 600px;
            border: 1px solid #000;
        }
    </style>
</head>
<body>
    <div id="map"></div>
</body>
</html>
MySQL Check Time Duration Passed?
 |
| MySQL Time Duration |
You may want to check whether a particular date has passed using start date, time duration and current date when the target date is not physically stored.
For clarity, consider a db table schema as follows.
For clarity, consider a db table schema as follows.
+-----------+--------------------------+------------------+
| event_id | start_time               | duration_seconds |
+-----------+--------------------------+------------------+
| 005      |'2014-10-1 12:13:08'      | 86400            |
+-----------+--------------------------+------------------+
Here `duration_seconds` is stored using integers. If TIME is used, there 's a limit for 24 hrs.
If you want to get only adverts that have not expired, you will run a query like this.
SELECT * FROM `events` WHERE TIME_TO_SEC(timediff(now(),start_time))<=`duration_seconds`;
Prevent HTTP Cache with PHP
 |
| HTTP Cache |
HTTP Cache can be troublesome during development in some occasions specially in developing and testing web services, testing endpoints. We can use PHP headers to prevent and disable HTTP cache.
header("Content-Type: application/json");
header("Expires: 0");
header("Last-Modified: " . gmdate("D, d M Y H:i:s") . " GMT");
header("Cache-Control: no-store, no-cache, must-revalidate");
header("Cache-Control: post-check=0, pre-check=0", false);
header("Pragma: no-cache");
CodeIgniter Like Flash Data in PHP
 |
| CodeIgniter |
class FlashMessage {

    public static function render() {
        if (!isset($_SESSION['my_my_messages'])) {
            return null;
        }
        $my_messages = $_SESSION['my_messages'];
        unset($_SESSION['my_messages']);
        return implode('<br/>', $my_messages);
    }

    public static function add($message) {
        if (!isset($_SESSION['my_messages'])) {
            $_SESSION['my_messages'] = array();
        }
        $_SESSION['my_messages'][] = $message;
    }

}
iPhone Push Notifications PHP Server

<?php
$ctx = stream_context_create();
stream_context_set_option($ctx, 'ssl', 'local_cert', YOUR_.PEM_FILE);
stream_context_set_option($ctx, 'ssl', 'passphrase', YOUR_PASSPHRASE);

$fp = stream_socket_client(
        'ssl://gateway.sandbox.push.apple.com:2195', $err, $errstr, 60, STREAM_CLIENT_CONNECT | STREAM_CLIENT_PERSISTENT, $ctx);

if (!$fp) {
    exit("Failed to connect: $err $errstr

");
}

echo 'Connected to APN
';


// Create the payload body
$body['aps'] = array(
    'badge' => +1,
    'alert' => 'Testing push notifications',
    'sound' => 'new_wall_paper.wav',
    'action-loc-key' => 'OK'
);

$payload = json_encode($body);

for ($i = 0; $i < count($tokens); $i++) {
    $msg = chr(0) . pack('n', 32) . pack('H*', $tokens [$i]) . pack('n', strlen($payload)) . $payload;
    fwrite($fp, $msg, strlen($msg));
}

echo "Completed sending messages";
fclose($fp);
?>
Passing Multiple Parameters to Form Validation Custom Callbacks in Codeigniter
CI natively only allows for single parameter in custom callbacks. For an instance see the following code.
$this->form_validation->set_rules
('hstate', 'State', 'required|callback_suburb_check[' . $suburb . ']');
If you need to pass multiple parameters, you have several options. Obviously you can change CI behaviour by subclassing the core library. But in this tutorial we follow the less pain approach. That 's to access required parameters via POST variables within your custom callback function. They are still available in this scope.
There is another way using your PHP string handling knowledge. Just formatting all the parameters as single string and passing to the callback function.
$parameters = 'first_arg' . '||' . 'second_arg' . '||' . 'third_arg';
$this->form_validation->set_rules
('some_field', 'Some Field Name', 'callback__my_callback_function['.$parameters.']');
Then in your callback,
function _my_callback_function($field_value, $second_parameter){
    list($first_param, $second_param, $third_param) = split('||', $second_parameter);
    ...
}
How to check HTML5 Web Storage Support in JavaScript?
 |
| HTML5 Data Storage |
function supports_html5_storage() {
                try {
                    return 'sessionStorage' in window && window['sessionStorage'] !== null;
                } catch (e) {
                    return false;
                }
            }
            alert(supports_html5_storage());
How to remove index.php from CodeIgniter URL in Ubuntu
|
| CodeIgniter |
application/config/config.phpchange:
$config['index_page']='index.php';$config['index_page']='';Create or modify .htaccess in project root with following content.
# Customized error messages.
ErrorDocument 404 /index.php
# Set the default handler.
DirectoryIndex index.php
# Various rewrite rules.

  RewriteEngine on
  RewriteCond %{REQUEST_FILENAME} !-f
  RewriteCond %{REQUEST_FILENAME} !-d
  RewriteRule ^(.*)$ index.php?/$1 [L,QSA]
Also allow overriding .htaccess in your apache
/etc/apache2/sites-available/defaultAllowOverrideAlland Restart Apache
sudo /etc/init.d/apache2 reloador
sudo service apache2 reloador
sudo /etc/init.d/httpd reloadHow to Install PhoneGap in Ubuntu
 |
| PhoneGap |
1. First, check you’ve got Java and Ant installed – you’ll need those later:
sudo apt-get install default-jre
sudo apt-get install default-jdk
sudo apt-get install ant
2. Install npm
sudo apt-get install npm3. Get the latest nodejs (by installing ‘n’ and running that):
sudo npm update npm -g
sudo npm install n -g
sudo n stable
4. Now install phonegap itself
sudo npm install -g phonegap5. Download the Android sdk from http://developer.android.com/sdk/index.html, put it somewhere sensible and unpack it:
sudo mv ~/Downloads/adt-bundle-linux-x86-20130917.zip /opt/
cd /opt
sudo unzip adt-bundle-linux-x86-20130917.zip
sudo chmod -R 777 /opt/adt-bundle-linux-x86-20130917
6. Update PATH in ~/.bashrc to include the phonegap tools:
# Add android sdk
PATH=$PATH:/opt/adt-bundle-linux-x86-20130917/sdk/platform-tools:/opt/adt-bundle-linux-x86-20130917/sdk/tools
and then ‘source ~/.bashrc’ to make sure you’ve got the new path setup.
7. Create a phonegap app (I use a “projects” subdirectoy):
cd ~/projects
phonegap create my-app
cd my-app
8. Before you run the app, you’ll need to set up an emulator – run the android tool:
android9. You may need to select a target (e.g. “Android 4.2.2 (API 17)”), and click the “Install 8 packages..” button (may need several clicks to accept all the licences)
Now setup and start an emulator – in the ‘android’ util, go to Tools -> Manage AVDs, go to the “Device Definitions”, select a device, and use the “Create AVD” button to create a new AVD. Then use the “Start..” button to start the AVD (it may take a surprisingly long time to start fully).
Run the app:
phonegap local run androidYou should see the app compile and install on the emulator.
You can do the compile and install steps separately:
phonegap local build android
phonegap install android
10. Add plugins
Optional Step
phonegap local plugin add https://git-wip-us.apache.org/repos/asf/cordova-plugin-device.git
phonegap local plugin add https://git-wip-us.apache.org/repos/asf/cordova-plugin-media.git
Original tutorial found at
http://julianhigman.com/blog/2013/10/17/notes-on-setting-up-phonegap-on-ubuntu-for-android-app-development/
Google Map Polygons Demo
 |
| Google Map Polygon |
How to get coordinates of a polygon?
How to delete a polygon?
<!DOCTYPE html>
<html>
<head>
<meta name="viewport" content="initial-scale=1.0, user-scalable=no">
<meta charset="UTF-8">
<title>Drawing Tools</title>
<script src="jquery-1.10.2.js"></script>

<script type="text/javascript"
src="http://maps.google.com/maps/api/js?sensor=false&libraries=drawing"></script>
<style type="text/css">
#map, html, body {
padding: 0;
margin: 0;
height: 100%;

}

#panel {
width: 200px;
font-family: Arial, sans-serif;
font-size: 13px;
float: right;
margin: 10px;
}

#color-palette {
clear: both;
}

.color-button {
width: 14px;
height: 14px;
font-size: 0;
margin: 2px;
float: left;
cursor: pointer;
}

#delete-button {
margin-top: 5px;
}
</style>
<script type="text/javascript">
var drawingManager;
var selectedShape;
var colors = ['#1E90FF', '#FF1493', '#32CD32', '#FF8C00', '#4B0082'];
var selectedColor;
var colorButtons = {};
var polygons = [];
var drawingManager = null;
var bermudaTriangle;

function clearSelection() {
if (selectedShape) {
selectedShape.setEditable(false);
selectedShape = null;
}
}

function setSelection(shape) {
clearSelection();
selectedShape = shape;
shape.setEditable(true);
selectColor(shape.get('fillColor') || shape.get('strokeColor'));
}

function deleteSelectedShape() {
if (selectedShape) {
selectedShape.setMap(null);
}
}

function selectColor(color) {
selectedColor = color;
for (var i = 0; i < colors.length; ++i) {
var currColor = colors[i];
colorButtons[currColor].style.border = currColor == color ? '2px solid #789' : '2px solid #fff';
}

// Retrieves the current options from the drawing manager and replaces the
// stroke or fill color as appropriate.
var polylineOptions = drawingManager.get('polylineOptions');
polylineOptions.strokeColor = color;
drawingManager.set('polylineOptions', polylineOptions);

var rectangleOptions = drawingManager.get('rectangleOptions');
rectangleOptions.fillColor = color;
drawingManager.set('rectangleOptions', rectangleOptions);

var circleOptions = drawingManager.get('circleOptions');
circleOptions.fillColor = color;
drawingManager.set('circleOptions', circleOptions);

var polygonOptions = drawingManager.get('polygonOptions');
polygonOptions.fillColor = color;
drawingManager.set('polygonOptions', polygonOptions);
}

function setSelectedShapeColor(color) {
if (selectedShape) {
if (selectedShape.type == google.maps.drawing.OverlayType.POLYLINE) {
selectedShape.set('strokeColor', color);
} else {
selectedShape.set('fillColor', color);
}
}
}

function makeColorButton(color) {
var button = document.createElement('span');
button.className = 'color-button';
button.style.backgroundColor = color;
google.maps.event.addDomListener(button, 'click', function() {
selectColor(color);
setSelectedShapeColor(color);
});

return button;
}

function buildColorPalette() {
var colorPalette = document.getElementById('color-palette');
for (var i = 0; i < colors.length; ++i) {
var currColor = colors[i];
var colorButton = makeColorButton(currColor);
colorPalette.appendChild(colorButton);
colorButtons[currColor] = colorButton;
}
selectColor(colors[0]);
}

function initialize() {
var map = new google.maps.Map(document.getElementById('map'), {
zoom: 10,
center: new google.maps.LatLng(22.344, 114.048),
mapTypeId: google.maps.MapTypeId.ROADMAP,
disableDefaultUI: true,
zoomControl: true
});

var polyOptions = {
strokeWeight: 0,
fillOpacity: 0.45,
editable: true
};
// Creates a drawing manager attached to the map that allows the user to draw
// markers, lines, and shapes.
drawingManager = new google.maps.drawing.DrawingManager({
drawingMode: google.maps.drawing.OverlayType.POLYGON,
markerOptions: {
draggable: true
},
polylineOptions: {
editable: true
},
rectangleOptions: polyOptions,
circleOptions: polyOptions,
polygonOptions: polyOptions,
map: map
});

google.maps.event.addListener(drawingManager, 'overlaycomplete', function(e) {
if (e.type != google.maps.drawing.OverlayType.MARKER) {
// Switch back to non-drawing mode after drawing a shape.
drawingManager.setDrawingMode(null);

// Add an event listener that selects the newly-drawn shape when the user
// mouses down on it.
var newShape = e.overlay;
newShape.type = e.type;
google.maps.event.addListener(newShape, 'click', function() {
setSelection(newShape);
});
setSelection(newShape);
}
});

// Clear the current selection when the drawing mode is changed, or when the
// map is clicked.
google.maps.event.addListener(drawingManager, 'drawingmode_changed', clearSelection);
google.maps.event.addListener(map, 'click', clearSelection);
google.maps.event.addDomListener(document.getElementById('delete-button'), 'click', deleteSelectedShape);

buildColorPalette();
google.maps.event.addListener(drawingManager, 'overlaycomplete', function(polygon) {
polygons.push(polygon);

});

}
google.maps.event.addDomListener(window, 'load', initialize);

function pointsToText() {

for (i = 0; i < polygons.length; i++) {
var coordinates = (polygons[i].overlay.getPath().getArray());

for (i = 0; i < coordinates.length; i++) {

$("#points").append("(" + coordinates[i]['k'] + "," + coordinates[i]['A'] + "),");

}
}
}
</script>
</head>
<body>
<div id="panel">
<div id="color-palette"></div>
<div>
<button id="delete-button">Delete Selected Shape</button>
</div>
<div>
<input type="button" onclick="pointsToText()" value="Get Coordinates">
<textarea id="points" cols="30" rows="20"></textarea><br>

</div>

</div>
<div id="map"></div>

</body>
</html>
Import Excel Data into MySQL with PHP
 |
| PHPExcelReader. |
To import Excel data, first you need to have a Excel reader. It should be accurate enough to interpret Excel data as expected. There 's a good old Excel reader.
Download PHPExcelReader.
In the downloaded archive, you only need Excel directory with files including oleread.inc and reader.php.
Just extract it where your web server can access.
Next place your excel file or just create one with some dummy data. Make sure this file is readble by the web server.
Finally create your php script to connect with database, read Excel file and insert data into db.
<?php

require_once 'Excel/reader.php';

$data = new Spreadsheet_Excel_Reader();

$data->setOutputEncoding('CP1251');

$data->read('a.xls');


$conn = mysql_connect("localhost","root","");

mysql_select_db("test",$conn);


for ($x = 2; $x <= count($data->sheets[0]["cells"]); $x++) {

$first = $data->sheets[0]["cells"][$x][1];

$middle = $data->sheets[0]["cells"][$x][2];

$last = $data->sheets[0]["cells"][$x][3];

$sql = "INSERT INTO mytable (First,Middle,Last)

VALUES ('$first','$middle','$last')";

echo $sql."\n";

mysql_query($sql);

}


?>
Best Symfony Bundles

Create PDF with fpdf

There are various PHP libraries to create PDF documents. FPDF, MPDF, DomPDF, HTML2PDF are among those popular ones. Each of them has some sort of uniqueness in terms of functionality. This tutorial is just a demo of FPDF using official distribution.
Demo
Subscribe to:
Comments (Atom)


0 comments: